I'm getting all kinds of fancy up in here! This is the SECOND nail tutorial I've done and for someone who sucks at nails, this is winning! That also goes to show you, that if you suck at nails too, you can fake it til you make it! Last time was Two Toned Nails, this time it's El Ombre (besties for life if you get that PeeWee's Playhouse reference)! This tutorial isn't the first of it's kind by any means. My purpose was really just to show you that anyone can do it. Seriously, anyone.
They're actually a lot easier than they look. If you have the right stuff, even a monkey can do it...or a 5 year old. But what's the difference? My daughter did hers right alongside me.
You're gonna need:
- 3 coordinating colors. Different enough that you can see the variance in shades but similar enough you can blend.
- A makeup sponge. Just those cheap wedges you can get in any drugstore.
- Q-tips (for your remover)
- Nail polish remover. Cause girl, you're going to have polish all over yourself.
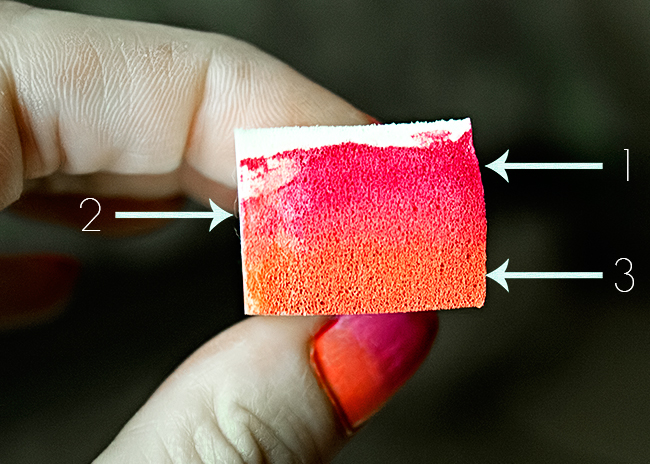
You're going to paint your polish directly onto the flat end of the sponge in 3 stripes. I overlap my lines just a little to help the colors blend a little more. There's no right width in your stripes, you just want them wide enough that they can cover the entire length of your nail.
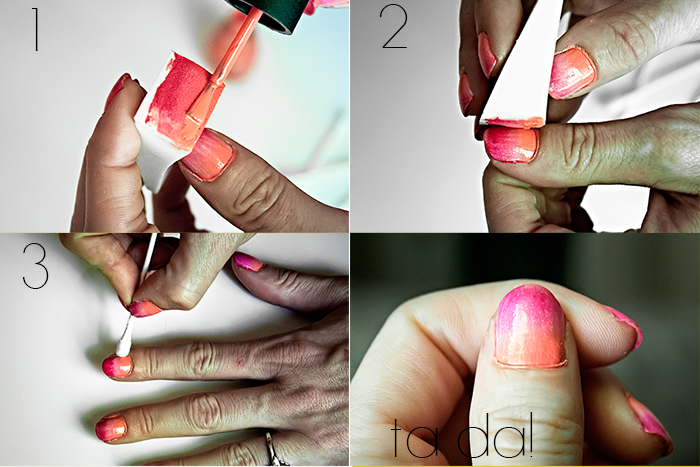
- Apply your polish to your sponge. At first the sponge is going to soak it right up so be liberal with the polish. After you do a few nails, you won't need so much.
- Stamp it straight onto your nail. Don't try to stay on the nail, get that polish all over if you have to. You want to make sure you get all of your nail covered so slide it up and down, back and forth, whatever. Depending on the opacity of your polish, you may have to do another round after your first coat dries. I did. I just went straight back over it the way I did the first time.
- After they dry, dip your Q-tip into your remover and go around all of the edges to get rid of any extra polish.
- You're done! I applied a top coat because the sponge does not leave your nails with a smooth finish. I applied my top coat a little too soon but it actually worked out because it blended my colors a little more.
Now, the tutorials I found said to start with white nails. I don't have any white polish so I just went with the lightest color I have. I imagine a white would help your color stand out and appear more vibrant but if you don't have any white either, you're still good. Go ahead and give it a try. If it turns out a hot mess, you already have your remover out! ;) Until next time...


I love your nails! I haven't done mine in a few weeks and think it's about time to do something fun again.
ReplyDeleteAnd your right anyone can do an ombre look, takes a very small bit of practice and then it's on!
Also I am not sure if there is a difference between a 5 year old and monkey, at least not in this household. There also isn't much difference between a 10 year old and a monkey.
Your nails look great! I love the colors you chose! Great job!
ReplyDeleteasyncopatedhome.blogspot.com
That is awesome!! I would have never thought to do them like that, great idea!
ReplyDeleteHaha! They're loud, they're clumsy and they make messes like it's their job....nope, no difference! lol I didn't even attempt the ombre for so long because I had no idea how easy it could be! Now it's all I do...I'm riding this trend out to the end! haha
ReplyDeleteThanks, Alicia! The middle color needed like 3 coats for any opacity whatsoever so it took some work but I think the colors are perfect for summer! :)
ReplyDeleteMe neither! Pinterest is fab-u-lous! haha
ReplyDelete